故事是這樣的,很久以前曾經在rust 上面實作 hello world 的 arm 程式 ,不過那時候的作法現在已經不能用,而且除了輸出x 之外其實不能幹嘛,更別提後面更多的東西了。
其實網路上也查得到不少Rust OS 的實作,沒道理我做不到,於是就來試一試了。
- mini-arm-os 的程式碼 :
- 參考金門大學傳說中的鍾誠教授的用十分鐘 向jserv學習作業系統設計
要跑這個首先要安裝 stm32 的qemu
注要在configure 的時候加上—disable-werror才能成功編譯,不然會遇到deprecated 的warning,完整的編譯參數
./configure --enable-debug --target-list="arm-softmmu" \
  --python=/usr/bin/python2.7 --disable-werror
另外要將rust 編譯為arm,我們需要安裝 rust 的cross compile tools,這裡有一篇文章把相關會遇到的問題都講得差不多了。
https://github.com/japaric/rust-cross
就算是一般使用我也推薦使用rustup,可以快速的在stable, beta, nightly 中切換; 用rustup 處理cross compile 的問題也很容易,如上頁所述的四個步驟:
- 安裝對應的C toolchain
- 用rustup 安裝編譯好的目標library
- 在~/.cargo/config指定特定target 的linker 要用誰,我猜這是因為LLVM 的linker 尚未就諸的緣故?
- 用 cargo build –target=$(target) 來指定編譯目標了
為了這個測試,我選用armv7-unknown-linux-gnueabihf,gcc 則是選用arm-linux-gnueabihf-gcc
rustup target add armv7-unknown-linux-gnueabihf
cat >> ~/.cargo/config < EOF
> [target.armv7-unknown-linux-gnueabihf]
> linker = "arm-linux-gnueabihf-gcc"
> EOF
cargo build --target=armv7-unknown-linux-gnueabihf
第一步是實作Hello world,雖然網路上有些純Rust 的實作,但這次想要自己重頭自幹,試圖完全用rust 代替c ,一些dirty work 總是少不了的,在最底層的部分還是先用 assembly 實作,找到適合的方法再用rust 改寫。
Assembly 的部分參考(複製貼上)這裡的code
https://community.arm.com/docs/DOC-8769
先寫一個最簡單的startup.S,isr 的部分只定義reset handler,並且用它的FUNCTION, ENDFUNC macro 實作defaultResetHandler和defaultExceptionHandler,內容物都是單純的迴圈:
.weakref            Reset_Handler,defaultResetHandler

.section            isr_vector
.align              2
.long               0  # initial stack pointer
.long               Reset_Handler # startup-code,系統上電時第一個執行的位址

.text
.align
FUNCTION            defaultResetHandler
b                   defaultExceptionHandler
ENDFUNC             defaultResetHandler

FUNCTION            defaultExceptionHandler
wfi                 # wait for an interrupt, in order to save power
b                   defaultExceptionHandler // loop
ENDFUNC             defaultExceptionHandler
編譯採用 arm-none-eabi-gcc,參數使用 -fno-common -O0 -mcpu=cortex-m3 -mthumb -T hello.ld -nostartfiles,直接編譯就會動了,
程式碼的hash 為 fdc836
當然只有assembly 是不夠的,我們要rust!
這裡參考之前看到這個神blog ,它在x86 上面用asm 跟rust 自幹了一個頗完整的kernel,現在我的狀況跟他在接上rust 的地方有 87 % 像
首先是寫一個Cargo.toml
[package]
name = "mini_arm"
version = "0.1.0"
authors = ["yodalee <[email protected]>"]

[lib]
crate-type = ["staticlib"]
然後新建檔案 src/lib.rs
#![no_std]
#![feature(lang_items)]

#[lang = "eh_personality"]
extern fn eh_personality() {}
#[lang = "panic_fmt"]
extern fn panic_fmt() -> ! {loop{}}

#[no_mangle]
pub unsafe fn __aeabi_unwind_cpp_pr0() -> () { loop {} }

#[no_mangle]
pub extern fn rust_main() {
    loop {}
}
開頭先用 #! 指定這個crate 的特性;指定 no_std免得rust std 那堆需要OS支援的檔案、system call 等東西跑進來亂; 指定lang_items feature 讓我們可以去調整rustc 的一些行為, 官方文件 是這麼說的:
The rustc compiler has certain pluggable operations, that is, functionality that isn't hard-coded into the language, but is implemented in libraries, with a special marker to tell the compiler it exists.
大意是需要透過lang marker 來告訴rustc,這裡我們有實作(或說更改)了某項功能,例如下面的 eh_personality 跟panic_fmt;
把 feature 拿掉,我們實作 eh_personality會造成錯誤 language items are subject to change;
把eh_personality 實作拿掉,則會變成 language item required, but not found;有點…詭異。
eh_personality負責的是Rust在panic 時 unwinding 的工作, 目前OS還不會unwinding 所以留白沒差;panic_fmt 則是panic! 的進入點,同樣不需要實作。
__aeabi_unwind_cpp_pr0 也是類似的狀況,如果不寫直接編譯,會發生undefined reference的錯誤,要使用 #[no_mangle] 避免function 名字被改掉;
最後就是我們的main function,同樣要用 no_mangle 來避免asm 找不到對應的function。
再來我們就能在reset handler 裡面動手腳了,把原本的迴圈改掉加上跳到rust_main 的指令:
FUNCTION            defaultResetHandler
bl rust_main
b  defaultExceptionHandler
ENDFUNC             defaultResetHandler
執行到這裡它就會進來執行我們的rust_main ;在Makefile 中加上cargo 的命令,就能成功編譯出執行檔,反編譯中也會看到對應的程式碼:
00000034 <rust_main>:

#[no_mangle]
pub extern fn rust_main() {
34: e24dd004  sub sp, sp, #4
loop {}
38: eaffffff  b 3c <rust_main+0x8>
3c: eafffffe  b 3c <rust_main+0x8>
後面的內容就跟神blog 的內容講得差不多,需要在Cargo.toml 中加上rlibc的dependencies,並且在linker 參數加上 --gc-sections,才能使用一些rust 的code。
[dependencies]
rlibc = "1.0.0"
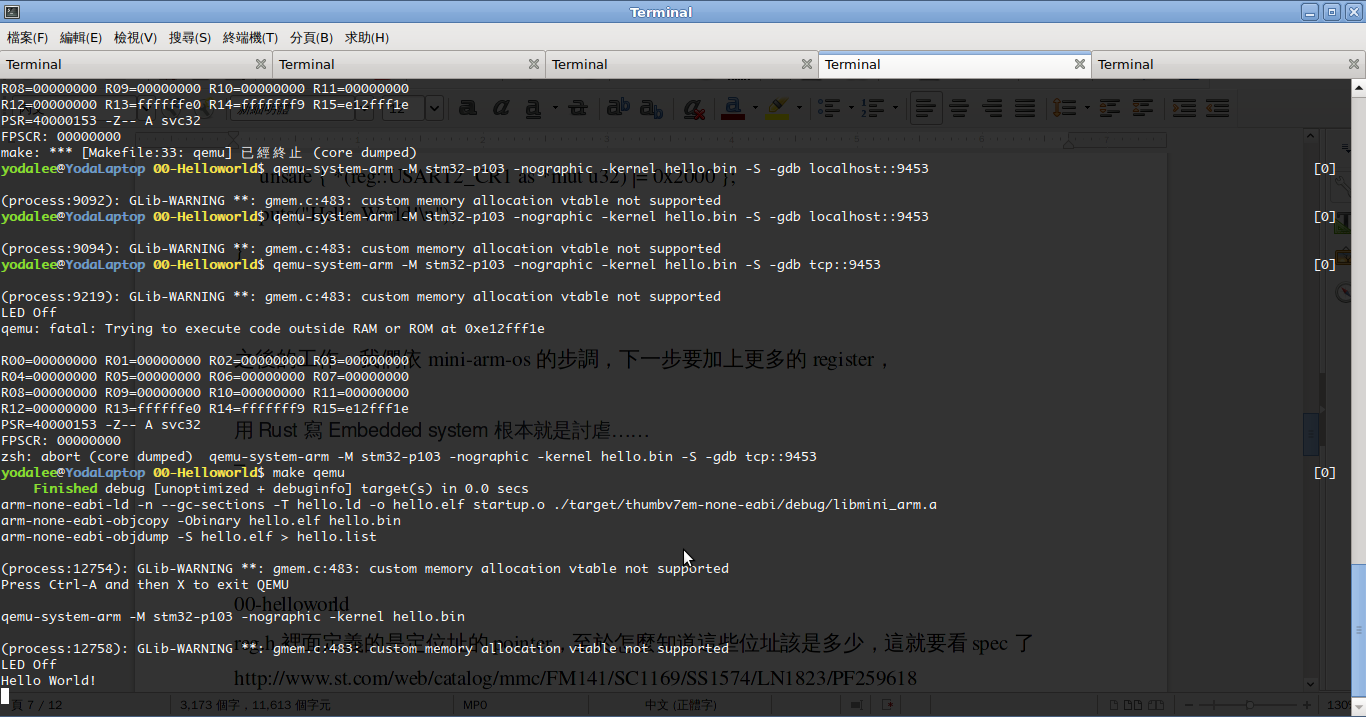
現在我們試著用qemu 執行時,qmeu 它爆炸了:
emu: fatal: Trying to execute code outside RAM or ROM at 0xe12fff1e

R00=00000000 R01=00000000 R02=00000000 R03=00000000
R04=00000000 R05=00000000 R06=00000000 R07=00000000
R08=00000000 R09=00000000 R10=00000000 R11=00000000
R12=00000000 R13=ffffffe0 R14=fffffff9 R15=e12fff1e
PSR=40000153 -Z-- A svc32
FPSCR: 00000000
使用qemu 搭配gdb 來檢查一下:
qemu-system-arm -M stm32-p103 -nographic -kernel hello.bin -S -gdb tcp::9453
$(gdb) file hello.elf
$(gdb) target remote localhost:9453
它一進到rust_main 之後就死機了,當下的第一個指令是:
34: e24dd004 sub sp, sp, #4
很奇怪的,這行指令就是一直讓它當掉,比對了C version之後,發現可能是eabi 的問題:
C用的是arm-none-eabi;我們則用了arm-linux-gnueabihf,於是我們要改用thumbv7em-none-eabi 的rustc;首先是從網路上拿到thumbv7em-none-eabi.json:
{
    "arch": "arm",
    "cpu": "cortex-m4",
    "data-layout": "e-m:e-p:32:32-i64:64-v128:64:128-a:0:32-n32-S64",
    "disable-redzone": true,
    "executables": true,
    "llvm-target": "thumbv7em-none-eabi",
    "morestack": false,
    "os": "none",
    "relocation-model": "static",
    "target-endian": "little",
    "target-pointer-width": "32",
    "no-compiler-rt": true,
    "pre-link-args": [
        "-mcpu=cortex-m4", "-mthumb",
        "-Tlayout.ld"
    ],
    "post-link-args": [
        "-lm", "-lgcc", "-lnosys"
    ]
}
參考這篇
的作法,
先把rust 的git repository 載下來,利用 rust --version -v 找到rustc 的build hash,將rust checkout 到相同的hash value
git clone https://github.com/rust-lang/rust
cd rust
git checkout $HASH
cd ..
把thumbv7em-none-eabi 存下來,就可以build 了:
mkdir libcore-thumbv7m
rustc -C opt-level=2 -Z no-landing-pads --target thumbv7em-none-eabi \
-g rust/src/libcore/lib.rs --out-dir libcore-thumbv7em
先用rustc --print sysroot 找到rustc 的根目錄位置:
~/.multirust/toolchains/nightly-x86_64-unknown-linux-gnu
把編譯出的 libcore-thumbv7em/libcore.rlib,放到對應的資料夾 $(rustc root dir)/lib/rustlib/thumbv7em-none-eabi/lib 裡面
$ pwd
~/.multirust/toolchains/nightly-x86_64-unknown-linux-gnu/lib/rustlib
$ tree thumbv7em-none-eabi
thumbv7em-none-eabi
└── lib
├── libcore.rlib
└── rustlib
現在就可以用cargo build –target=thumbv7em-none-eabi 來編譯了;編譯完之後qemu 也不會當機了;同樣只有loop 的main,linux-eabi 跟none-eabi 的結果差異:
armv7-unknown-linux-gnueabihf, failed:
1c: e24dd004 sub sp, sp, #4
20: eaffffff b 3c <rust_main+0x8>

thumbv7em-none-eabi, worked:
10: b081 sub sp, #4
12: e7ff b.n 14 <rust_main+0x4>
到這裡我們就能來寫code 了,首先我們要把裡面的register 都獨立出來到一個reg.rs 裡面
#![allow(dead_code)]

/* RCC Memory Map */
pub const RCC: u32 = 0x40021000;
pub const RCC_APB2ENR: u32 = RCC + 0x18;
pub const RCC_APB1ENR: u32 = RCC + 0x1C;

/* GPIO Memory Map */
pub const GPIOA: u32 = 0x40010800;
pub const GPIOA_CRL: u32 = GPIOA + 0x00;
pub const GPIOA_CRH: u32 = GPIOA + 0x04;

/* USART2 Memory Map */
pub const USART2: u32 = 0x40004400;
pub const USART2_SR: u32 = USART2 + 0x00;
pub const USART2_DR: u32 = USART2 + 0x04;
pub const USART2_CR1: u32 = USART2 + 0x0C;
在main 裡面就能對各register 進行操作了,因為rust 對安全性的要求,所有對定位址的操作都是unsafe 的;另外之前支援的 number as *mut _ 已經不能用了,現在要指明哪一種型別的pointer :
const USART_FLAG_TXE: u16 = 0x0080;

pub fn puts(s: &str) {
    for c in s.chars() {
        unsafe {
            while !(*(reg::USART2_SR as *mut u32) & USART_FLAG_TXE as u32 != 0) {}
            *(reg::USART2_DR as *mut u32) = c as u32;
        }
    }
}

#[no_mangle]
pub extern fn rust_main() {
    unsafe { *(reg::RCC_APB2ENR as *mut u32) |= 0x00000001 | 0x00000004 };
    unsafe { *(reg::RCC_APB1ENR as *mut u32) |= 0x00020000 };
    unsafe { *(reg::GPIOA_CRL as *mut u32) = 0x00004b00 };
    unsafe { *(reg::GPIOA_CRH as *mut u32) = 0x44444444 };
    unsafe { *(reg::USART2_CR1 as *mut u32) = 0x0000000C };
    unsafe { *(reg::USART2_CR1 as *mut u32) |= 0x2000 };

    puts("Hello World!\n");
}
終於,我們看到傳說中的 Hello World! 啦,為了這一步可是歷經千辛萬苦呀
請先進指教。