This content is translated with AI. Please refer to the original Traditional Chinese version (zh-TW) for accuracy.
First off, the conclusion: I don't know
This is inherently a difficult topic. Vivado is not inherently implemented for automation (at least it doesn't appear to be), and its graphical interface integrated with the Vivado project storage environment offers many functions. However, practically speaking, it is completely inadvisable to stuff the entire Vivado project generated files into version control, as even the slightest modification can cause chaos in the version control system, making Vivado projects a pain point in terms of automation and version management.
This problem troubles many, and you can find numerous discussions with a quick search, such as How do you manage your Vivado projects in git? . Some have proposed their solutions, for instance, the project vivado-git , though I haven't tried it to know its effectiveness.
After some experimentation, I'd like to share the current management method I'm using in company projects. This article will be divided into two main parts:
- Taking the Adder mentioned in AXI Lite , we need to package the IP almost with one click and output it to a specified location.
- Using the IP generated in the previous step, incorporate it into the block diagram, and prepare to generate a bitstream project.
The Vivado scripts below are somewhat related to paths, so let's first explain the working directories:
origin_dir is the main directory of the entire project — it's called this because that's what Vivado's script calls it.
src: Directory for HDL code.script: Directory for Vivado generation scripts and resources.ip_repo: Working directory for IP before being scripted.proj: Vivado project for the complete packaging of IP to FPGA.tmp_pkg: Temporary Vivado project.
The positions of ip_repo, proj, tmp_pkg are Vivado project locations and can be added to .gitignore.
Packaging IP
Generating AXI Files
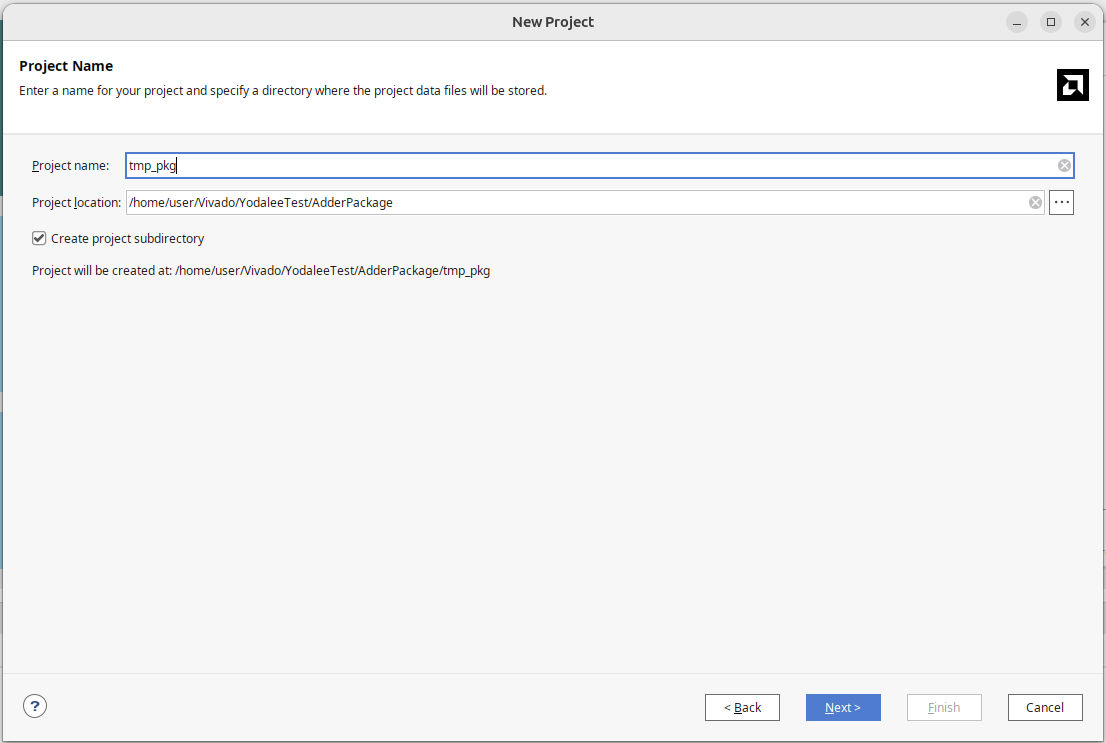
Initially, only the files you want to package are on hand, and you still need the AXI interface files generated by Vivado. Start by opening Vivado and creating a new project, which will be discarded later, so name it tmp_pkg without adding source code.
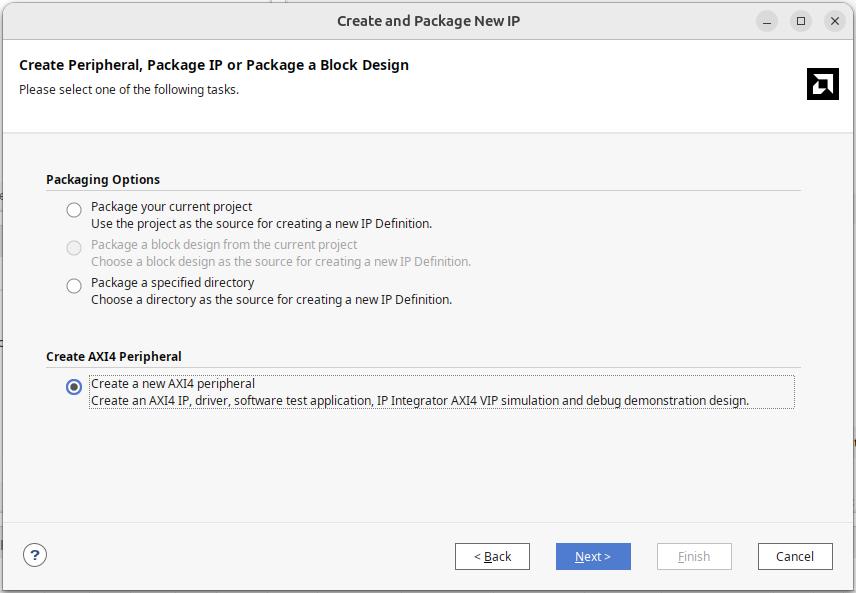
Select Tool -> Create and Package New IP -> Create a new AXI4 Peripheral. The module information mainly involves setting the name, which will correspond to the file name, as well as desired AXI Lite settings like the number of registers, etc.
Take the IP name for example as Adder, set the location inside origin_dir; in the final step, do not select Edit IP, choose Add IP to the repository, and hit Finish to close the project.
Look into origin_dir/ip_repo, where you can find two files generated by Vivado:
- Adder_v1_0.v: Top-level of the IP.
- Adder_v1_0_S00_AXI.v: AXI Lite slave handler.
Copy these two files together into the src directory, then you can delete both tmp_pkg and ip_repo directories.
Packaging IP
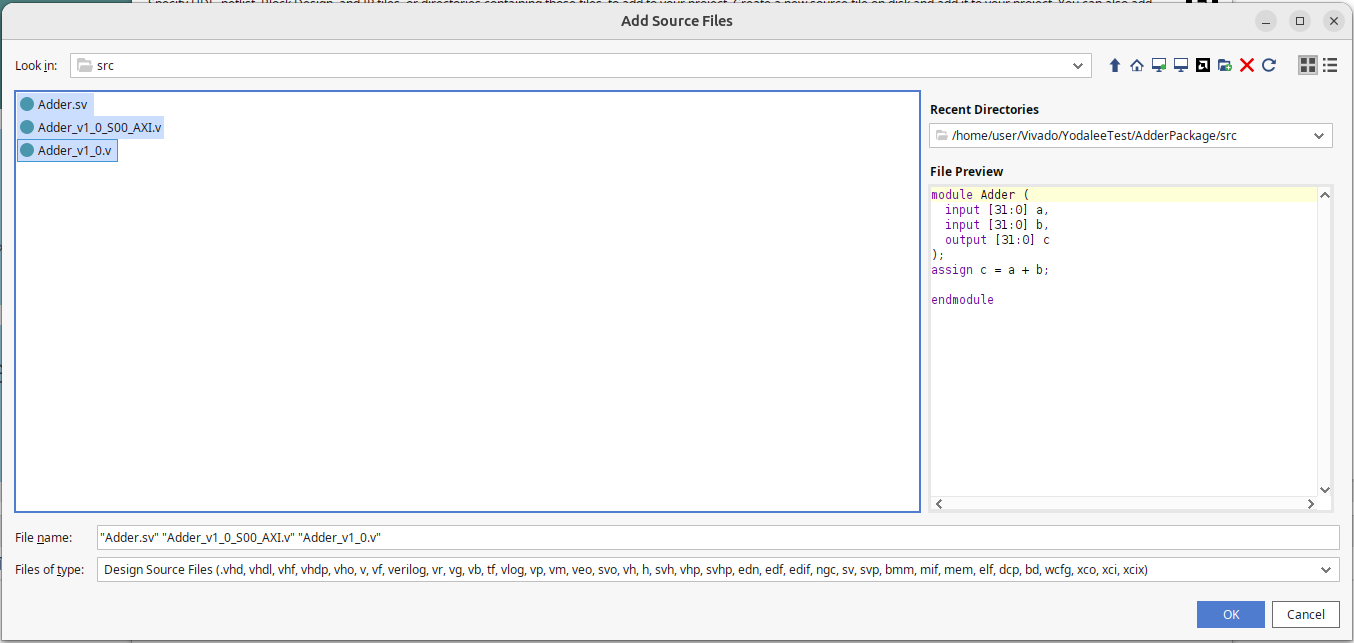
Complete the modifications to the AXI file beforehand, open Vivado to create the tmp_pkg project from scratch again. Add Source, add the source code of your project and the two newly added AXI-related files into this project.
Select Tool -> Create and Package New IP -> Package your current project. IP location is first chosen as origin_dir/ip_repo, as many additional files will be generated during editing, so place it temporarily.

Vivado opens a workspace, with some differences from the usual Vivado. I've marked them in the picture below:
Additional options like Edit Packaged IP appear on the left; click it to open the window on the right, where you can edit IP information, interfaces, parameters, and finally, click package IP to complete the packaging. After packaging, Vivado will ask if you want to close this temporary project; remember to choose no, and find the packaging script in the below tcl window. If closed, it doesn't matter, a general one is attached below.

Once complete, we'll automate the above process by choosing File -> Project -> Write TCL so that Vivado writes the actions to package_ip.tcl.
When writing package_ip.tcl, write it first to origin_dir, then move it to the script folder. Directly saving to the script folder will cause a lot of ../ to handle in the document.

Modifying package_ip.tcl
The freshly written tcl script by Vivado is usable but contains too much irrelevant content. These three files total 550 lines; a cleanup is needed to remove unnecessary parts. Nowadays, many cleanups can be aided by AI.
- In ip_repo, find component.xml and move it to the script folder; then modify package_ip.tcl to change the path of component.xml to script.
- Find the line with create_project, add
-force, so that when run a second time, it can overwrite even if tmp_pkg already exists. - Find the definition and calls to
proc checkRequiredFilesand delete the entire segment. You can leave it, but I find it refreshing to remove it; if the source changes, only one place needs to be modified. (However, if your source changes, it's likely you need to repackage). - Find
proc print_help, from its definition, to the part belowif { $::argc > 0 }, delete the entire segment.
Some snippets like:
if { [info exists ::origin_dir_loc] } {
  set origin_dir $::origin_dir_loc
}
allow you to change origin_dir with environment variables. As they are short, they can be deleted or left.
From the lower part of the tcl, it will sequentially:
- Create sources_1 and add source code (usually most of this).
- Create constrs_1 and add constraint files.
- Create sim_1 to save simulation files.
- Create synth_1 to save synthesis results.
- Create impl_1 to save implementation (P&R) results.
- Based on your script, impl_2 might also appear.
Since we are packaging IP, everything from sim_1 and below can be completely omitted, just delete them; constrs_1 can also be considered for deletion if there's nothing.
Note when packaging, Vivado automatically determines the interface you're using. Like ours, named starting with s00_axi_, containing awready, wready, bready, and so forth, Vivado deduces it as AXI Lite and maps port to the corresponding interface. Since we use Vivado generated AXI Lite .v files, this process is likely trouble-free; if self-authored, settings in Port and Interface maps the move completed on packaging must be recorded by Vivado.
Some of the information might be hidden within componenet.xml, though I'm unsure about it.
Modifying ip_repo Location
In this research, I found it's best to have a shared ip_repo directory on the whole system and place all the hardware IP repositories generated into that directory.
Here, I chose ${HOME}/ip_repo, adding the following to package_ip.tcl:
set home_dir $::env(HOME)
set ip_repo_dir [file normalize [file join $home_dir "ip_repo"]]
Not saying Vivado can't set multiple repository locations, but seeing a list growing longer is challenging to manage, better to centralize it. As for whether to network this ip_repo directory automatically compiling, CI/CD uploading when each hardware IP updates, or to apply version control or not, it exceeds this article’s scope and needs modification depending on planning within the company/organization.
Packaging Script
The final step, if Vivado hasn't written the packaging part, add the following:
set core_name "adder"
set core_version "1.0"
set core_vendor "user.org"
set core_library "User"
set display_name "adder_v1_0"
set description "Wrap Adder into AXI Lite"
set ip_root_dir [file normalize \
  [file join $ip_repo_dir "${core_name}_${core_version}"]]
set proj_dir [file normalize "./${_xil_proj_name_}"]

file mkdir $ip_repo_dir
if { [file exists $ip_root_dir] } {
  file delete -force $ip_root_dir
}
file mkdir $ip_root_dir

update_compile_order -fileset sources_1
ipx::package_project -root_dir $ip_root_dir -vendor $core_vendor \
  -library $core_library -taxonomy {/UserIP} -import_files

set core [ipx::current_core]
set_property name $core_name $core
set_property version $core_version $core
set_property display_name $display_name $core
set_property description {$description} $core
ipx::merge_project_changes files $core
ipx::save_core $core
ipx::unload_core $core

set fileset_obj [get_filesets sources_1]
if { $fileset_obj != {} } {
  set_property "ip_repo_paths" $ip_repo_dir $fileset_obj
  update_ip_catalog -rebuild
}

close_project
file delete -force $proj_dir

puts "INFO: Packaged IP into $ip_root_dir"
puts "INFO: Removed temporary project directory $proj_dir"
The display_name and description can be modified based on the current IP being packaged.
Note this script is destructive, it will delete and recreate the package directory under ${HOME}/ip_repo; also, it closes and deletes tmp_pkg when done.
Packaging Block Diagram
The second script, typically called script/xxx_proj.tcl, is responsible for linking the block diagram, hereafter referred to as proj.tcl.
The generation method is relatively simpler:
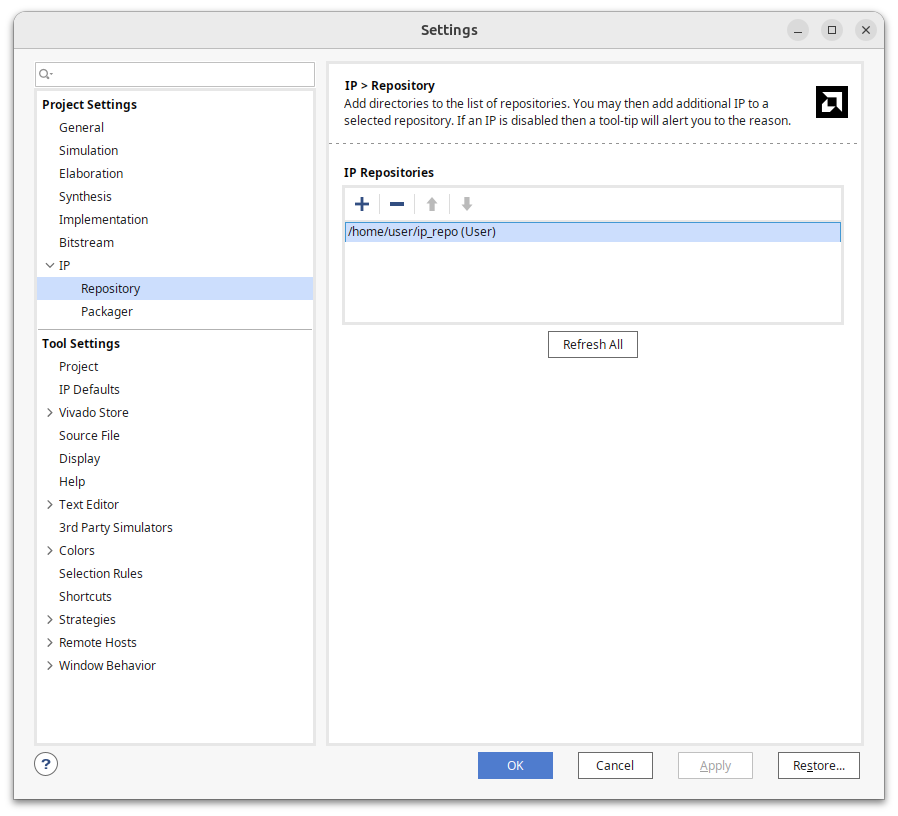
- Set Vivado IP search paths pointing to the aforementioned directory, select
Tools->Settings, and configure in IP/Repository as shown below
- Create a new block diagram and connect components like processors, IP, AXI Interconnects, etc.
- Create HDL Wrapper
- Write TCL to export proj.tcl.
When writing TCL, option Recreate Block Designs using Tcl is available:
- Check Recreate Block Designs using Tcl
- Do not select Recreate Block Designs using Tcl, but add the .bd file generated in xxx_proj to your src and modify the tcl file path pointing to the .bd file.
The first choice results in a lengthy .tcl containing instructions to redraw the entire block diagram from scratch; the second choice, though, doesn't result in a shorter .bd relative to .tcl, and it's harder to read and manage, so I choose the first option to remake the block diagram.
Modifying proj.tcl
After writing proj.tcl, the alterations are mostly like those of package_ip.tcl (since both were written by Vivado):
- In the line with create_porject, similarly add
-force. - Find the definition and calls to
proc checkRequiredFilesand delete the entire segment. - Find
proc print_help, from its definition, to the part belowif { $::argc > 0 }, delete the entire segment. - Synth_1 etc., in the second script, are not necessarily deleted, as a project with a block diagram will ultimately run implementation, leaving them doesn’t hurt, but remove them if you find the file too lengthy.
Similar to package_ip.tcl, add the ip_repo setting:
set home_dir $::env(HOME)
set ip_repo_dir [file normalize [file join $home_dir "ip_repo"]]
And search for ip_repo_paths, modifying the original relative path to ip_repo_dir, letting Vivado find the IP packaged in the previous step.
if { $obj != {} } {
  set_property "ip_repo_paths" "[file normalize "$ip_repo_dir"]" $obj
}
Once these two files are ready, I'll use it this way:
vivado -mode batch -source script/package_ip.tcl
vivado -source script/proj.tcl
The first line completes IP packaging; the second line opens Vivado to prepare the block diagram, waiting for you to hit synthesis, implementation, generate bitstream. If you are very confident in your design, you can press synthesis, implementation, generate bitstream before creating proj.tcl, then write out the.tcl file so that execution runs all the way to finishing the bitstream.
What's Next?
These two scripts currently satisfy me; however, based on my own observations, there are areas for improvement:
First, clean the tcl further for clarity, separate the src parts into a file, letting tcl read it, thus allowing a single tcl script to directly be copied for other projects, without repeating all steps for each new project. Second, the packaging IP script clearly should accomplish more tasks (but not too much), at least verify that the IP hasn't had any major issues.
The suitable actions in Vivado, as far as I know, are limited to two, anything else seems excessive:
- Run Linter to check for errors.
- Run Synthesis to check for errors.
Moreover, there's the issue of Vivado versions, which doesn't require much thought: this aspect of Vivado can only be described as a tragedy
Vivado on the other hand, not so much. You want to pick ONE version and use it for your project. And everyone working on it will need to use the same version.
Translated, it means "You get to choose one version and stick with it.”
We once had a collaborative partner who installed 2022.2, but we accidentally upgraded to 2023.2, causing everything to explode, and they couldn't run our scripts. The solution was reinstalling 2022.2 specifically for them.
We've also encountered projects to review whose scripts were written for version 2025.1, which we obviously couldn't run. With scripts, there's no hope once Vivado updates – prepare to redo them.
And another major pain point is tcl scripts being heavily tied to the FPGA, board, SoC, etc., in use, making it very difficult to use a single script to read in different setting files to generate bitstream files for different FPGAs in use, and there's currently no great solution for this.
Conclusion
This has been the current implementation of Vivado automation plans, far from perfect but usable. I hope it may be helpful to everyone, and I also hope to inspire discussion and improvement, if anyone has any hidden Vivado usage secrets, feel free to comment below to share, so together we can discover what constitutes the best practice in Vivado automation.